Author’s note: These articles were written for the “original” step system, not the revisions introduced in Third Edition.
This is the third in a series of articles that examines the Step System, the engine under the hood of the Earthdawn game. In this installment, we look at one of the most persistent questions in fandom.
Why use d20+d4 and not 2d12?
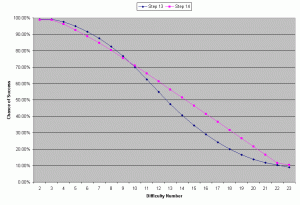
As we saw at the end of the previous article, an interesting thing happens to the shape of the probability curves when we move from Step 13 (d12+d10) to Step 14 (d20+d4). Step 13 generates more of a bell shaped curve that drops off rather quickly, while Step 14 generates a more linear curve that drops off more gradually.
 When we graph them on the same pair of axes, we get the graph to the right (as usual, click on the picture for a larger version).
There are three interesting things that happen here—two of them are obvious from the graph, the third not so obvious. First of all, the d20 dominates the curve, resulting in an almost linear distribution. This means that instead of having results that cluster in the middle (with fewer results at the extremes), the results are more evenly spread across a wider band, and extreme results (good and bad) are seen a bit more often.
Second, while the average result (and therefore the overall chance for success) is higher for Step 14, there is a range of Difficulty Numbers (2 through 9) where it is actually more advantageous to roll Step 13 instead of Step 14. The difference is most significant with a Difficulty Number of 6 (almost a 3% better chance of success with Step 13).
On the other hand, there is a range of Difficulty Numbers (14 through 19) where Step 14 is significantly more advantageous than Step 13—jumping out to an almost 13% greater chance of success with a Difficulty Number of 16. The only other time you see such a significant jump in the chance of success is going from Step 7 to Step 8. This jump in the real meat of desirable results shouldn’t be discounted, even if lower results do appear a bit more often.
The third — and less immediately obvious — detail is the chance of invoking a Rule of One result. For Step 13, there are a total of 120 (12 x 10) basic combinations, with a 1/120 (or 0.83%) chance of rolling “1” on both dice. Step 14 only has 80 (20 x 4) basic combinations, for a 1/80 (or 1.25%) chance of invoking the Rule of One. It’s a difference of only about one-half of a percent (about one roll in 200), and while not actually insignificant, isn’t very large.
With all of the ‘hiccups’ that appear in the system at this point, many people ask why not use 2d12 for Step 14 instead of d20+d4? It seems to more logically follow the progression of the previous Steps, and the basic shape of the probability curve will more closely follow the previous steps, resulting in less statistical strangeness. Let’s explore this question by looking at what happens to the overall progression of the curves with this change.
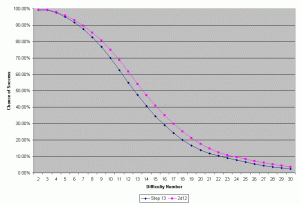
First, let’s look at a graph comparing Step 13 to 2d12. You can see it to the left.
There isn’t anything especially remarkable about this progression. As with the earlier range of two-die steps, we keep the same basic shape, increasing the chance of success for any given target number by about 3% (on average). Compared to the original shift we see for this change in Step, this seems a much more desirable progression.

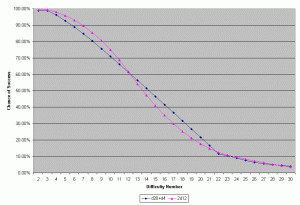
Now we’ll compare the original Step 14 with 2d12.
Much like the original comparison of Step 13 to Step 14, we have a range of lower Difficulty Numbers (2-12) where the new dice are more advantageous than the original dice, and a range of higher Difficulty Numbers (13-21) where the original step is more likely to succeed than the new dice. The difference isn’t as strongly pronounced as the Step 13 vs. Step 14 comparison, but it is still there. The curves also cross each other once again (DN 22-28), but the difference in the chance of success for any of these numbers is less than 1%—and before long the curves cross again, returning the slight statistical advantage to d20+d4.
These results aren’t terribly surprising either—this is the sort of thing we can expect when we change from a broader, more even distribution to a more centrally weighted one.

But look at the next change—from 2d12 to Step 15 (d20+d6).
Here we see evidence of the same basic problems we had for the original Step 13 to Step 14 change—a range of lower Difficulty Numbers where the old step is more advantageous (capping out at about 2%), a bubble of higher Difficulty Numbers where the new step is clearly more advantageous (nearly 11% at its peak), and if we crunch the numbers, we once again find a slightly greater chance of a “Rule of One” result with the new step (about 0.14% or one roll in 720).
It would seem that the problem we tried to fix with this dice substitution didn’t really fix any of the problems—it only pushed them off and made them slightly less pronounced. Since there isn’t any obvious replacement for the d20+d6 of Step 15, to truly eliminate the statistical anomalies that appear on this part of the Step Table, more serious and far-reaching changes must be made—by eliminating the d20 from the table entirely, and shifting to three dice sooner. Indeed, there are several house-rulesets on the net that do just that.
(Author’s note: The Third Edition rules went this route, dropping the d4 and the d20 from the step progression, using 2d12 for Step 13 and shifting to three dice at Step 14 — d12+2d6.)
I would counter that the original progression is deliberate, and chosen for a couple of reasons. First, a statistical analysis shows that the differences between d20+d4 and 2d12 balance out, with one or the other being better depending on the Difficulty Number. While d20+d4 fails a little bit more often than 2d12 on lower Difficulty Numbers, it succeeds against Difficulty Numbers in the true meat of the range more often. In my opinion, this is a desirable outcome—I’ll accept the higher chance of failing against an 8 (about 5%) against the higher chance of success against a 17 (about 6.75%).

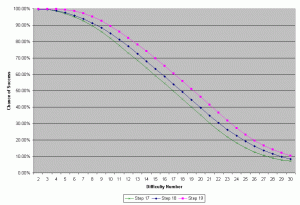
Finally, the more linear distribution for the d20 steps is more in line with the distributions of the other Step ranges; the single-die steps are heavily linear (albeit repeating), and the three-die steps are likewise more evenly distributed, as a graph comparing Steps 17, 18 and 19 (the last of the two-die and the first of the three-die steps) shows.
I believe that the original design intent of the Step System is to provide a more even distribution, as opposed to a more centrally weighted one. The shortcoming of the system is in the lower range of two-die steps, which provide a weighted-toward-average distribution. This sets up an expectation in the mind of the player, and the behavior of the rest of the Step System doesn’t line up with those preconceptions.
This psychological aspect of the system is made worse by two things: the appearance and predominance of this range of Steps in the early development of a character. It isn’t until characters reach Journeyman levels (Circles 5-8)—after many sessions, and dozens of hours of play—that many of their Steps enter the higher range of two-die steps. A kind of conditioning takes place that, while not entirely incorrect, has skewed player expectations in a direction that isn’t really supported by the system.
The second psychological aspect of the system is the tendency to remember the really good, or the really bad results. The hundreds of rolls that fall (as they will) in the average expected range of the Step aren’t remembered—it’s that Rule of One when you must succeed, or the quadruple explosion that gets remembered. Since lower results do crop up slightly more often starting at Step 14 than they had been, they get remembered more often, reinforcing the psychological preconception in the player’s mind.
I’m not saying there isn’t anything to the shift that takes place (the statistics in this article show otherwise), but the player’s expectations are a large factor in how that shift is perceived.
If, after looking at the numbers, you decide you would like to change Step 14 to 2d12 (or even adopt more extensive changes to the Step System), there is one last thing you need to consider in addition to which dice you use. We’ll explore that other important piece of the Step System—the Results Table—in the next installment.

